Making an 8ft Wide Picture Frame
My friend’s father asked me if I knew anyone that could build a very large picture frame. Being the aspiring maker I am, and having built zero picture frames before, I said “sure, how hard can it be?”
The basic features of this frame were that it needed to hold this photo of a beach, which was actually made of 8 or 9 8.5″ x 11″ sheets glued to a stiff backer board.
It also needed to hold a piece of glass slightly larger than this photo.
The two stylistic requirements were that it be done with a half-lap joint, and have two dowel joints in each corner for cosmetic purposes.
In order to build this, I needed to do the following:
Cut the 4 sides to length
Make the half-lap joints
Make the recess on the back of the pieces to accommodate the thickness of the glass and the photo
Glue the joints together
Drill holes and insert dowels in the corners
That’s it! And as long as everything goes to plan, it shouldn’t take very long. *wink*
Just to be sure I got the process right, I decided to make a mini version of the frame. Same features, same board thickness, just much smaller frame width and height.
It wound up taking the better part of 3 days, but I wound up learning a lot from doing the first one.
In order to make the half-lap joints, my solution was to use a hand router in a custom-built jig.
It was mostly made from really nice scrap MDF around the shop. The thickness was a little shy of the stock material, so I wound up shimming it with some washers.
The basic premise was I could stick just the end of the board in this jig, have it meet up with a specific marking or endstop, and just move the router around within the constrained area.
The board would be clamped initially just by a C-clamp, but later I devised a setup that used a rounded-off wood screw and a piece of scrap oak to act as a cushion between the screw and the board.

This setup worked great! Because I made the opening just big enough to hold these boards, it held things pretty consistently and tightly, which meant all the cuts were really consistent. Not perfect, but thankfully they didn’t need to be. His criteria for the style was to look old and handbuilt, so any minor flaws actually help sell the look.
To do the recess for the glass and photo, rather than try to use the table saw to do a cut in the middle of a piece, or to cut a groove all the way through and leave a couple of open spots on the sides of the frame, I used a router table.
I was able to make markings on the workpiece and on the fence of the router table so I knew where my start and end points were. I could have used endstops instead for more consistency, but it didn’t seem necessary.
This is how the little frame came out. The lap joints had a really close fit with minor gaps here and there, but it was nothing a little wood glue couldn’t fill in.
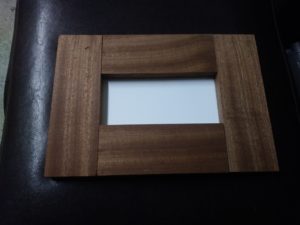
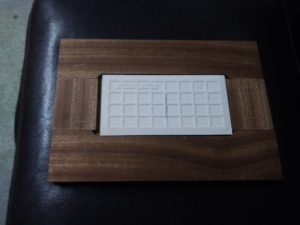
It just so happened to fit a rectangular ceramic tile I got for a totally separate project! I love it when a lack of a plan comes together.
One important thing I learned is that it helps to do the lap joints first before routing the groove for the picture on the “back”. If there’s a mistake or blowout on one side you can put that on the backside. No one will ever see your shame.
Since the small frame went well, I decided to go for making the big one. Only issue was I didn’t get around to it for another month or two, and I had forgotten a lot that I learned from the first one.
That included what the lengths of thing should even be, and I wound up starting a work session cutting my stock too short and needed to buy more to replace it.
Mistakes happen sometimes, and when that happened I decided the only thing I should do that day is buy replacement wood and try again tomorrow. Once the mistakes start showing up they tend to bring friends.
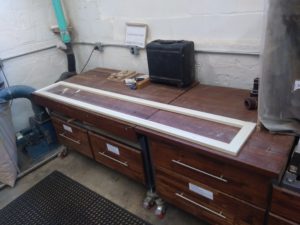
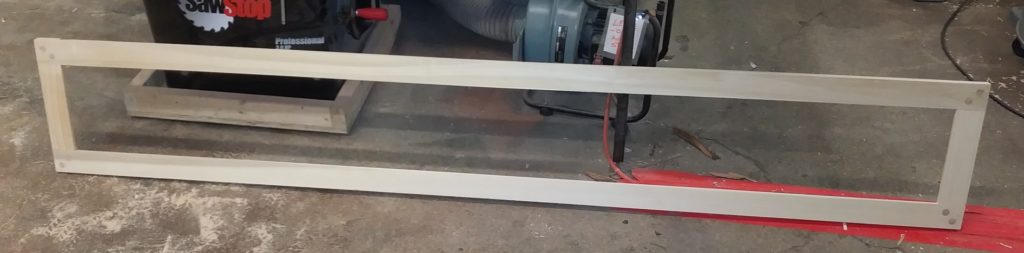
Fast forward a bit, and the larger frame is mostly done! The lap joints went pretty smoothly, and the inner recessed edge has also been routed out.
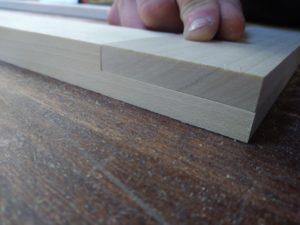
A close-up of one of the better half-lap joints. This is the beauty of a well-made jig.
The final assembly after gluing it up and putting oak dowels in the corners. It’s hard to convey just how gigantic this wound up being.
When all was said and done, he liked the result and planned to take care of the rest – getting the glass and applying stain.
I imagine it’s now hanging up at a beach house, adding to an already rustic style.